Basic usage
Welcome to the GRAMEP "Basic Usage" handbook. This section provides a starting point for users who are new to GRAMEP or need a refresher on its key features and functionality. You'll find step-by-step instructions, clear examples, and best practices to help you get started with GRAMEP. This tutorial will give you with the information and skills to properly use GRAMEP for your unique needs, whether you are a beginner discovering the software for the first time or an experienced user looking for a quick reference.
How to install
The use of pipx is recommended for installing GRAMEP:
Although this is only a recommendation, you can also install the project with the manager of your choice. For example, pip:
About this handbook
This tutorial provides several examples. While executing the commands, you may encounter slight differences in the output due to potential updates to the program or files. However, these variations will not impact the program's functionality.
Commands
GRAMEP is a multi-purpose Command Line Interface (CLI) software for genomics analysis. It provides a variety of sophisticated tools packaged in subcommands, allowing users to efficiently execute specified tasks. The following subcommands are provided to enable various genomics capabilities:
get-mutations: Perform k-mer analysis and generate optional reports.
get-only-kmers: Get only the exclusive k-mers.
get-intersection: Find intersections between variants in your data.
classify: Use this command for variant classification.
predict: Make predictions on variants.
from-configfile: Execute GRAMEP based on configurations from a file.
grid-search: Perform grid search to suggest a value for word and step size.
Each subcommand caters to a specific task, empowering you to customize your genomics analysis precisely to your needs. Dive into these subcommands to unlock the full potential of GRAMEP and elevate your research and analysis workflows.
Accessing Tutorial Files
To follow this short tutorial on using the GRAMEP method, you'll need specific files relevant to your analysis. If you already have these files, you can use your local copies. However, if you don't have the required files or want to ensure you have the most up-to-date versions, we recommend downloading them from our official repository.
Download the Tutorial Files: Download Link
Simply click on the download link provided above to access the necessary files. Once downloaded, you'll be ready to start the tutorial and explore the capabilities of GRAMEP for genomics analysis.
In this tutorial, we downloaded and saved the data in a folder named tutorial_data, which includes three subfolders: VOCs, reference, and reference_annotation.
The VOCs folder contains variant sequences in .FASTA format.
The reference folder houses the SARS-CoV-2 virus's reference sequence obtained from NCBI.
The reference_annotation folder holds the .gff3 file containing annotations for the SARS-CoV-2 genome.
Identifying most informative SNPs with 'get-mutations'
The get-mutations command in GRAMEP plays a crucial role in identifying the most informative Single Nucleotide Polymorphisms (SNPs) for a specific lineage of the analyzed organism. This step applies the principle of maximum entropy to select SNPs that provide the highest information content. Because it is based on the maximum entropy principle, it is strongly recommended that a considerable amount of input data be provided for optimal results.
To configure the get-mutations command according to your analysis needs, you can access its parameters and options by using the --help flag. This command provides a detailed list of available settings and instructions on how to use them effectively. Simply execute the following command in your terminal:
This will display all the parameters and options that you can use to fine-tune the get-mutations command, allowing you to perform precise SNP identification for your genomics analysis.
The parameters identified as required are essential and must be provided for the method's successful execution. Among these, word and step parameters play a crucial role in conducting an in-depth analysis of the most informative SNPs.
The word parameter is especially useful for identifying areas of interest within the investigation. The step parameter, on the other hand, sets the size of the sliding window and whether overlap between the k-mers derived from each sequence is required.
--mode parameter
There are two modes for performing the analysis: snps and indels. The snps mode is used to identify SNP-type mutations, while the indels mode detects insertion, deletion, and substitution-type mutations.
The choice of mode depends on the objective. The snps mode is generally faster, whereas the indels mode may take longer to execute. Additionally, when using the indels mode, it is necessary to adjust the --snps-max parameter, as the results are obtained using the Myers algorithm.
By utilizing the previously provided downloadable data, we can proceed to run an example aimed at identifying the most informative SNPs for a specific SARS-CoV-2 variant.
--save-path parameter
We strongly recommend saving the results of your get-mutations command to a dedicated folder. Specifically, we suggest including the /mutations/ folder as part of the saving directory.
In the example provided, we executed the analysis specifically for the Gamma variant. We configured the word and step parameters to values 10 and 1, respectively. Additionally, we instructed the program to generate a comprehensive report, which includes the following information for each sequence:
- Sequence ID
- Region name where the mutation occurred
- Start and end positions of that region in the genome
- Region type
- Mutation location in the reference
- K-mer found in both the reference and the variant
- The nitrogenous base change from the reference to the analyzed variant
Furthermore, we saved the most informative k-mers exclusive to the Gamma variant. This detailed report and the exclusive k-mers are saved in tutorial_data/output/ folder.
Multiple variants analysis
If you need to run the method on various variants of the same organism, you can create a shell script to automate the execution for different variants.
Within the /tutorial_data/output directory, a dedicated folder is automatically created for each variant, named after the input FASTA file used. Inside each variant's folder, you will find the following essential files and resources:
- Exclusive K-mers: These are available in both binary format (.sav) and plain text format (.txt), providing valuable genetic insights.
Example of .txt:
['AACAAACAAA', 'ACAAACAAAC']
- Mutation Frequency Table: A CSV file (.csv) containing the frequency of each mutation occurrence in the input data.
Example of frequency table file:
position;reference_value;variant_value;frequency
28262;G;A;49
33;C;A;49
28270;T;A;49
2698;T;A;49
15215;G;A;49
-
FASTA of variant mutation: A .FASTA file detailing mutations identified in the variant compared to the reference sequence.
-
Report (Optional): If requested, a CSV file (.csv) that provides detailed information about the analysis.
First lines of the report generated in .csv format:
sequence_id;annotation_name;start;end;type;modification_localization_in_reference;reference_kmer;exclusive_variant_kmer;reference_snp;variant_snp
OM245115.1;NO_ANNOTATIONS_AVAILABLE;NO_ANNOTATIONS_AVAILABLE;NO_ANNOTATIONS_AVAILABLE;NO_ANNOTATIONS_AVAILABLE;33;AACAAACCAA;AACAAACAAA;C;A
OM245115.1;ORF1ab;266;21555;gene;15215;AACAAGCAAA;AACAAACAAA;G;A
OM245115.1;NO_ANNOTATIONS_AVAILABLE;NO_ANNOTATIONS_AVAILABLE;NO_ANNOTATIONS_AVAILABLE;NO_ANNOTATIONS_AVAILABLE;28262;AACGAACAAA;AACAAACAAA;G;A
OM245115.1;ORF1ab;266;21555;gene;2698;AACAAACAAT;AACAAACAAA;T;A
- Mutations Data: The mutations detected in both binary format (.sav) and plain text format (.txt).
Example of .txt:
['28262:GA', '28270:TA', '33:CA', '15215:GA', '2698:TA']
-
BED: The variations in .bed3 format.
-
Graphical Representation: A PDF file (.pdf) illustrating the positions of identified mutations for visual clarity.
Example of graphical representation:
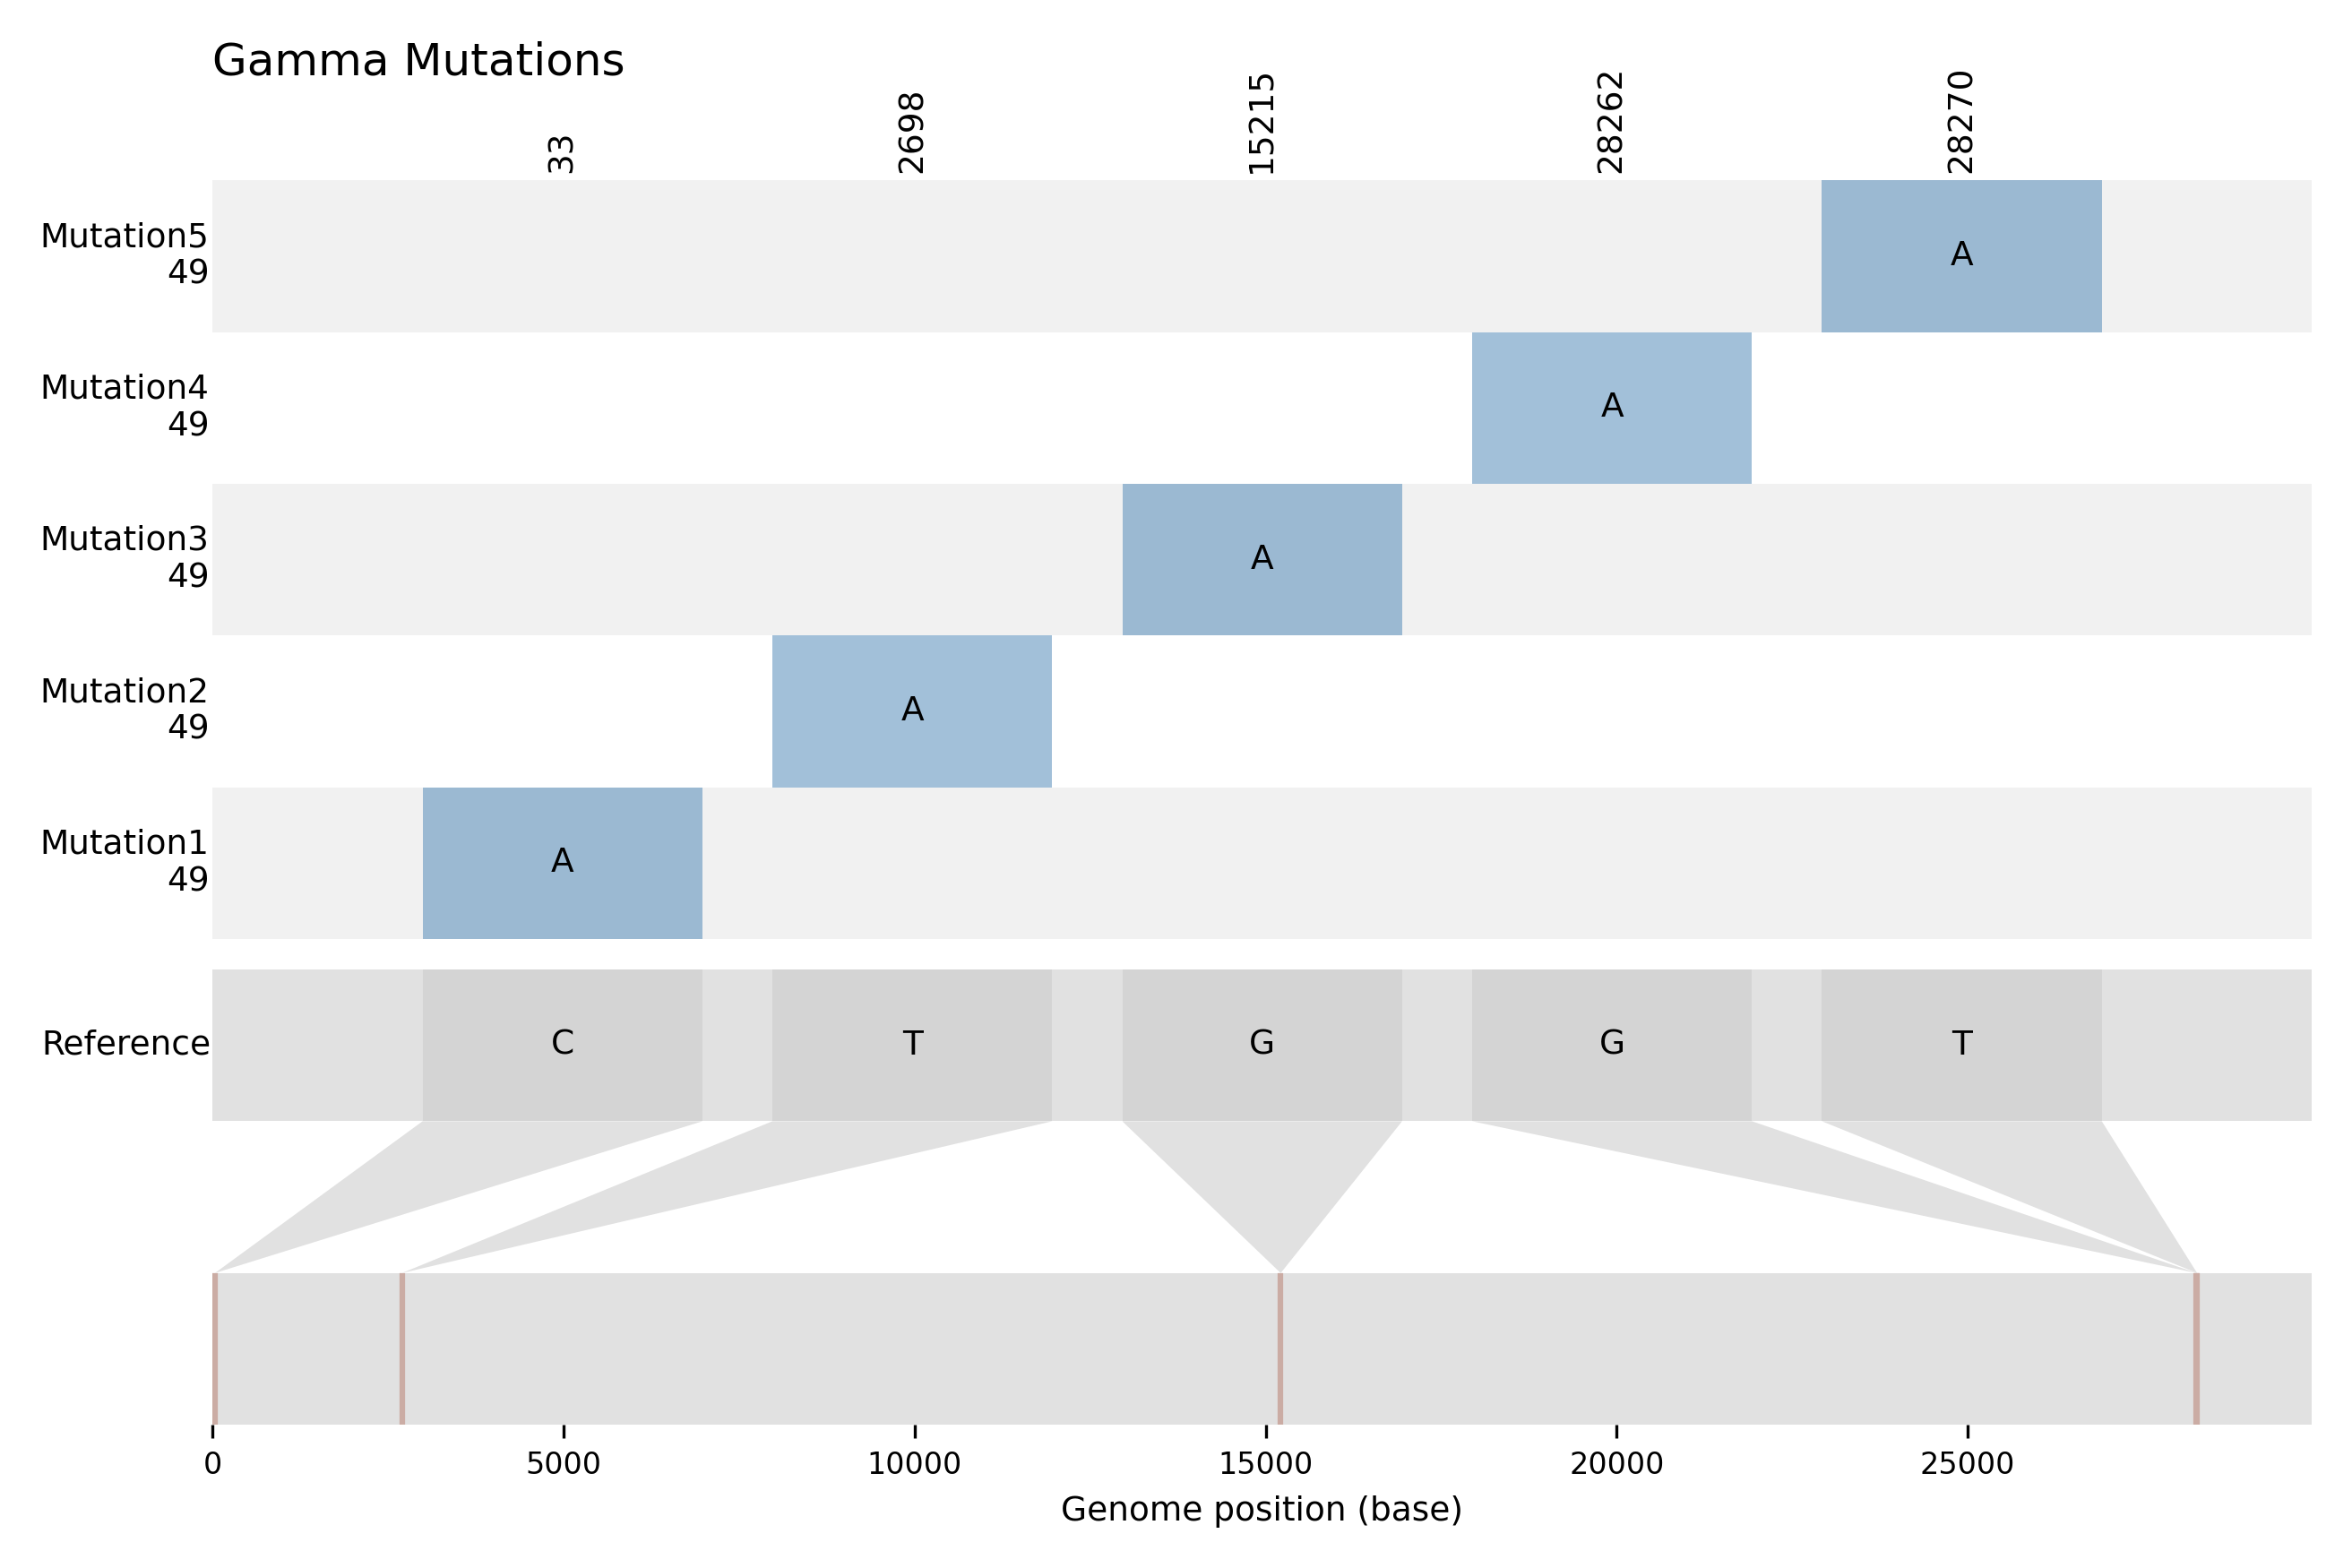 The y-axis of the graph represents the mutations, with the frequency of occurrence displayed just below each mutation label. Meanwhile, the x-axis corresponds to the reference genome.
Executing only the Extraction of Exclusive K-mers
If you only need the kmers unique to the variant, you can get them via the get-only-kmers command.
Usage: gramep get-only-kmers [OPTIONS] Get only exclusive k-mers. ╭─ Options ─────────────────────────────────────────────────────────────────────────────────────────────────────────────────────────────────╮ │ * --rpath TEXT 📂 Path to reference sequence. [default: None] [required] │ │ * --spath TEXT 📂 Path to sequences. [default: None] [required] │ │ * --word -w INTEGER 📏 Word size. [default: None] [required] │ │ * --step -s INTEGER ⏭ Step size. [default: None] [required] │ │ --dictonary -d TEXT 🧬📖 DNA dictionary. [default: DNA] │ │ --save-kmers 💾 Save exclusive k-mers. │ │ --save-path TEXT 📂 Path to save results. [default: None] │ │ --chunk-size INTEGER 📦 Chunk size for loading sequences. [default: 100] │ │ --help Show this message and exit. │ ╰───────────────────────────────────────────────────────────────────────────────────────────────────────────────────────────────────────────╯
Identifying Shared Mutations Between Variants with get-intersection
Once you have executed the get-mutations command for multiple variants, you might want to determine which mutations are common among these analyzed variants. In such cases, the get-intersection command is employed.
To access the available options and obtain help for this command, simply include the --help flag in your execution call.
Usage: gramep get-intersection [OPTIONS] Get intersection between variants. ╭─ Options ──────────────────────────────────────────────────────────────────────────────────────────────────────────────╮ │ * --save-path TEXT 📂 Folder where the results obtained through the get-mutations │ │ subcommand were saved. │ │ [default: None] │ │ [required] │ │ --intersection-seletion -selection TEXT ✔ Select intersection type. To specify the variants for │ │ intersection, provide them separated by '-'. For example: │ │ 'variant1-variant2-variant3'. │ │ [default: ALL] │ │ --help Show this message and exit. │ ╰────────────────────────────────────────────────────────────────────────────────────────────────────────────────────────╯
To perform the most basic analysis with the get-intersection subcommand, you need to specify the following parameters:
| Parameter | Type | Description |
|---|---|---|
| --save-path | Text |  Folder where the results obtained through the Folder where the results obtained through the get-mutations subcommand were saved. Is required. |
| --intersection-seletion | Text |  Select intersection type. To specify the variants for intersection, provide them separated by Select intersection type. To specify the variants for intersection, provide them separated by -. For example: 'variant1-variant2-variant3'. |
Multiple variants intersection
It's important to note that performing intersection analysis between multiple variants can be computationally intensive and time-consuming.
In this scenario, let's consider the /tutorial_data/output/ folder, which contains the output generated by the get-mutations command for all variants. If you haven't executed the get-mutations command for all variants and wish to do so, please refer to the previous section.
By default, the --intersection-selection parameter performs the intersection analysis among all variants located in the folder specified by the --save-path parameter. However, it is also possible to selectively choose specific variants for intersection analysis. To achieve this, simply list the desired variants separated by hyphens, as indicated in the command's help documentation.
The file containing the intersections of mutations between variants will be stored in the directory specified by the --save-path parameter. Below, you can find the file generated by the previously executed command.
Beta-Delta: 241:CT, 8861:GC, 203:CT, 20173:GT
Beta-Alpha: 241:CT, 8861:GC, 203:CT, 20173:GT
Delta-Alpha: 241:CT, 8861:GC, 203:CT, 20173:GT
Beta-Delta-Alpha: 241:CT, 8861:GC, 203:CT, 20173:GT
Training a Classification Model with classify
The process of training and validating a prediction model is accomplished using the classify command. To access additional information about this command and its options, simply include the --help flag when using it.
The classify subcommand of GRAMEP is used to train classification model to classify biological sequences.
The input parameters for the model are analogous to those discussed previously. The key difference lies in the use of the --save-path parameter, which specifies the directory containing folders with results for each variant obtained from the get-mutations command.
During the model training stage, feature extraction is performed using the most informative k-mers unique to each previously analyzed variant. The dir-path parameter specifies the directory where the sequences, used for training the model, are located. For each variant, this directory must contain a .fasta file named after the variant.
k-mers length
As of the current version, it's required that all unique most informative k-mers share the same size, and this size must be specified using the word parameter. However, in future updates, this restriction will be lifted, allowing the use of k-mers with different sizes. Stay tuned for these upcoming enhancements.
To execute the classify command for the data that was previously obtained, simply enter the following command in your terminal:
Danger
The results obtained in this tutorial are solely for the purpose of demonstrating the package. The model presented here is a toy model and should not be employed for analytics or production use. For genuine analysis and production scenarios, it's imperative to train a new model using real data and a larger dataset. Please refrain from using this model beyond the scope of this tutorial.
Inside the tutorial_data/ folder, you will find a new folder classify with two new directories: model, which houses the binaries files related to the trained model, and results, which contains files pertaining to the model's validation. These validation files include the confusion matrix (confusion_matrix.png), text-formatted metrics (metrics.txt), and the feature matrix (dataframe.csv).
Predicting classes for new sequences with predict
After you've trained and validated a classification model with the classify command, you can use the predict command to make predictions on fresh sequences. Simply include the --help flag when running the command for further information and guidance.
By using the predict command, you can apply your trained model to make accurate class predictions on new biological sequences.
It's crucial to ensure that the word and step parameters match the values used during the training stage of the classification model. This consistency is essential for accurate predictions. To get a better understanding of how the predict command works, let's apply it to an example file.
After executing the command, a file named predict_data.csv will be generated within the directory specified by the --dir-path parameter. This file will contain the ID and predicted class for each sequence provided via the -pseqpath parameter.
First lines of the predict_data.csv generated:
ID,Predicted
OM310688.1,Omicron
OM294815.1,Omicron
OM294926.1,Omicron
OM295048.1,Omicron
OM295263.1,Omicron
Executing GRAMEP Using a Configuration File with from-configfile
In certain scenarios, it becomes necessary to use a configuration file that contains all the parameters and configurations for GRAMEP. This approach allows for streamlined execution by specifying only the desired objectives.
To execute GRAMEP using a configuration file, you can utilize the from-configfile command. This command is designed to read the parameters and settings from the provided configuration file, streamlining the execution process.
To explore the available options and learn how to use the from-configfile command effectively, you can use the --help flag. This command returns comprehensive help information, guiding you through the steps of executing GRAMEP using a configuration file.
The descriptions of the parameters are provided below. The --objective parameter accepts one of the following inputs: get-mutations, get-intersection, classify, or predict.
| Parameter | Type | Description |
|---|---|---|
| -o | Text | 📝 Objective. Options: get-mutations, get-intersection, classify, predict. |
| -c | Text | 📂 Path to config file. [default: None] |
The configuration file for GRAMEP follows a standardized structure, ensuring consistency and ease of use. It must contain specific variables for each objective, organized into distinct groups. These groups help categorize the parameters required for different GRAMEP commands, streamlining the configuration process.
Here are the key groups within the configuration file:
[mutations]: This group encompasses parameters essential for executing theget-mutationscommand.[intersection]: The parameters required for theget-intersectioncommand are contained within this group.[classify]: For executing theclassifycommand, you'll find the necessary parameters in this group.[predict]: Thepredictcommand's mandatory parameters are listed within this group.
To illustrate this configuration structure, we provide a complete example of a configuration file. You can open the exact file from the tutorial_data folder.
This standardized format simplifies the setup process and ensures that all required parameters are appropriately organized for each specific objective.
[mutations]
# Reference path
reference_path = data/reference/SARS-CoV2_wuhan_refseq.fasta
# Sequence path
sequence_path = data/VOCs/Delta.fasta
# Annotation path
annotation_path = data/reference_annotation/GCF_009858895.2_ASM985889v3_genomic.gff
# Mode
mode = snps
# Save path
save_path = data/output/mutations/
# Word size
word = 10
# Step size
step = 1
# Max SNPs allowed
snps_max = 1
# dictonary (ACTG/ACGU)
dictonary = ACTG
# Create report
create_report = True
# Chunk size
chunk_size = 100

[intersection]
# Save path
save_path = data/output/mutations/
# Intersection Seletion (Use the name of the variants separated by - or 'ALL' option)
intersection_seletion = ALL

[classify]
# Word size
word = 10
# Step size
step = 1
# Save path
save_path = data/output/mutations/
# Dir path
dir_path = data/VOCs/
# Get kmers
get_kmers = False
# dictonary (ACTG/ACGU)
dictonary = ACTG
# Chunk size
chunk_size = 100

[predict]
# Word size
word = 10
# Step size
step = 1
# Save path
save_path = data/output/mutations/
# Predict sequence path
predict_seq_path = data/VOCs/Omicron.fasta
# Dir path
dir_path = data/output/classify/
# dictonary (ACTG/ACGU)
dictonary = ACTG
# Load ranges path
load_ranges_path = data/output/classify/model/ranges.sav
# Load model path
load_model_path = data/output/classify/model/model.sav
# Chunk size
chunk_size = 100
After completing the configuration file with the necessary parameters, executing the command becomes straightforward. Simply specify the desired objective and provide the location of the configuration file when invoking the from-configfile command.
For each command specified using the --objective parameter, it will be executed following the procedures outlined in the preceding sections.
Getting suggested values for word and step parameters using grid-search
One way to obtain suggested values for the word and step parameters is to use the grid-search command.
word and step values
The values chosen for word and step significantly influence the obtained results. These parameters can impact the coverage of mutations and may contribute to the occurrence of false positive mutations.
For comprehensive details on available options and usage, use the --help flag.
Performing the suggested search for word and step values requires providing two key inputs:
- Reference sequence for the variant: This serves as the baseline for identifying mutations.
- File containing variant sequences: This file should be of moderate size for efficient processing due to the computationally intensive nature of the search.
Additionally, you need to specify the search range for both word and step parameters using the following flags:
--min-word: Minimum value for the word length.--max-word: Maximum value for the word length.--min-step: Minimum value for the step size between words.--max-step: Maximum value for the step size between words.
Furthermore, you need to inform the type of sequence to be analyzed through the --dictonary parameter. This parameter ensures the search considers the appropriate mutations based on the specific biological sequence type (e.g., DNA, RNA).
An example execution is shown below:
The values obtained through the grid-search are suggested values and may not be optimal. Following this process, manual adjustments may be necessary, especially when focusing on a specific variant under study.
About this Basic usage
This tutorial was authored in December 2024, and it's possible that the commands may receive updates in the future. To ensure you have the most current information and options, we recommend consulting the --help command, which is a reliable way to stay up-to-date.
If you come across any errors in this tutorial, please feel free to do so using the following link. Your contributions are greatly appreciated and help maintain the tutorial's accuracy and usefulness.